This tool lets you dump the DRC boot ROM from your Wii U Gamepad.
It could theoretically also work for the Wii U's DRH chip, which likely uses the same boot ROM as the Gamepad's DRC chip.
You can build this yourself (see instructions below) or use a pre-built release.
wupbootdump.bin and dump.py should be placed in the same folder.
You will need to solder wires to your Gamepad's serial header. The pads should be visible when removing the battery cover:
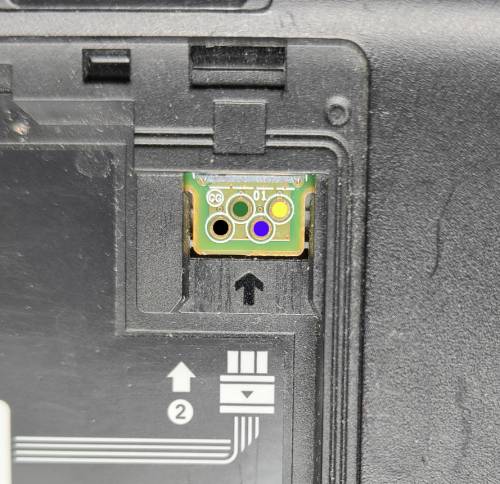
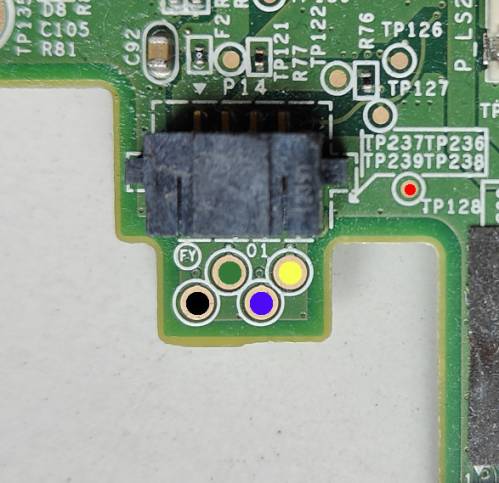
(https://kuribo64.net/wup/doku.php?id=test_points#serial_header)
- 1: (black) RXD
- 2: (green) UART boot
- 3: (blue) TXD
- 4: (yellow) Vcc (2.8V)
- 5: (red) ground
RXD is data coming into the Gamepad, and should be connected to your host's TXD pin. Similarly, the gamepad's TXD should be connected to your host's RXD pin.
The UART boot signal (2) must be tied to ground to enable UART boot.
There are three possible ways to get a connection to ground:
- soldering to TP128 (shown in red), requires opening the gamepad
- scraping off the solder mask near the serial pads, to solder to the ground plane
- if you are using a battery pigtail, you can connect to the black wire
Some USB UART devices may cause the Gamepad to fail to start unless the gamepad's RXD line is disconnected. In this case, using the gamepad's Vcc as I/O voltage on the UART device (instead of the supplied 3.3V), if possible, solves the problem.
You will also need to ensure your solder joints don't protrude too high, so that you can still connect a battery.
You can test whether everything is working by starting the Gamepad without tying the UART boot signal to ground. The gamepad should start normally.
Once all is connected and good, start the Gamepad by applying power to it.
In UART boot mode, the Gamepad will appear to do nothing. (this is why you should test it in normal mode prior, as mentioned above -- to make sure it is actually working)
Run the dumper:
python dump.py <serialport> bootrom.bin
<serialport> should be the name of your UART device.
The script will upload the payload to the Gamepad. This takes about 6 minutes.
Once that is done, the Gamepad's HOME LED should flash once, to indicate that the dumper is running.
When the script is done, you can turn off your Gamepad. You should get a file named bootrom.bin.
The boot ROM's SHA256 hash should be 1ba084d39f36f3fa2d8d4b671e762e08d8893651f94c8f31a0892dc9e12a7fc1.
(let me know if you get a different hash!)
You need the following packages:
- arm-none-eabi-gcc-cs
- arm-none-eabi-binutils-cs
You should be able to just type make to build the dumper.
With minor modifications, this dumper can also be used to dump the DRH boot ROM from a Wii U.
Here is an adequate binary: https://kuribo64.net/get.php?id=IilzIechMTu4xMrI
Base UART clock is adjusted, and UIC-related code is removed.
The test points on the Wii U motherboard are as follows:
- TP40: TXD
- TP179: RXD
- TP178: UART boot
This is provided for the sake of completeness. DRH uses the same boot ROM as the Gamepad's DRC.